> ## Documentation Index
> Fetch the complete documentation index at: https://docs.retellai.com/llms.txt
> Use this file to discover all available pages before exploring further.
# Connect Salesforce to Retell AI with OAuth 2.0
> Connect Salesforce to Retell AI using OAuth 2.0 Client Credentials — create a Connected App, get your Consumer Key and Secret, and start syncing contacts.
This guide walks you through creating a Salesforce Connected App and obtaining the credentials needed to connect Salesforce to Retell AI.
Retell uses the **OAuth 2.0 Client Credentials** flow for server-to-server authentication. This means no interactive login is required — Retell authenticates directly using the credentials you provide.
## Prerequisites
* A Salesforce edition with API access (Enterprise, Unlimited, Developer, or Performance)
* System Administrator permissions in Salesforce
* A dedicated integration user account (recommended)
## Step 1: Create a Connected App
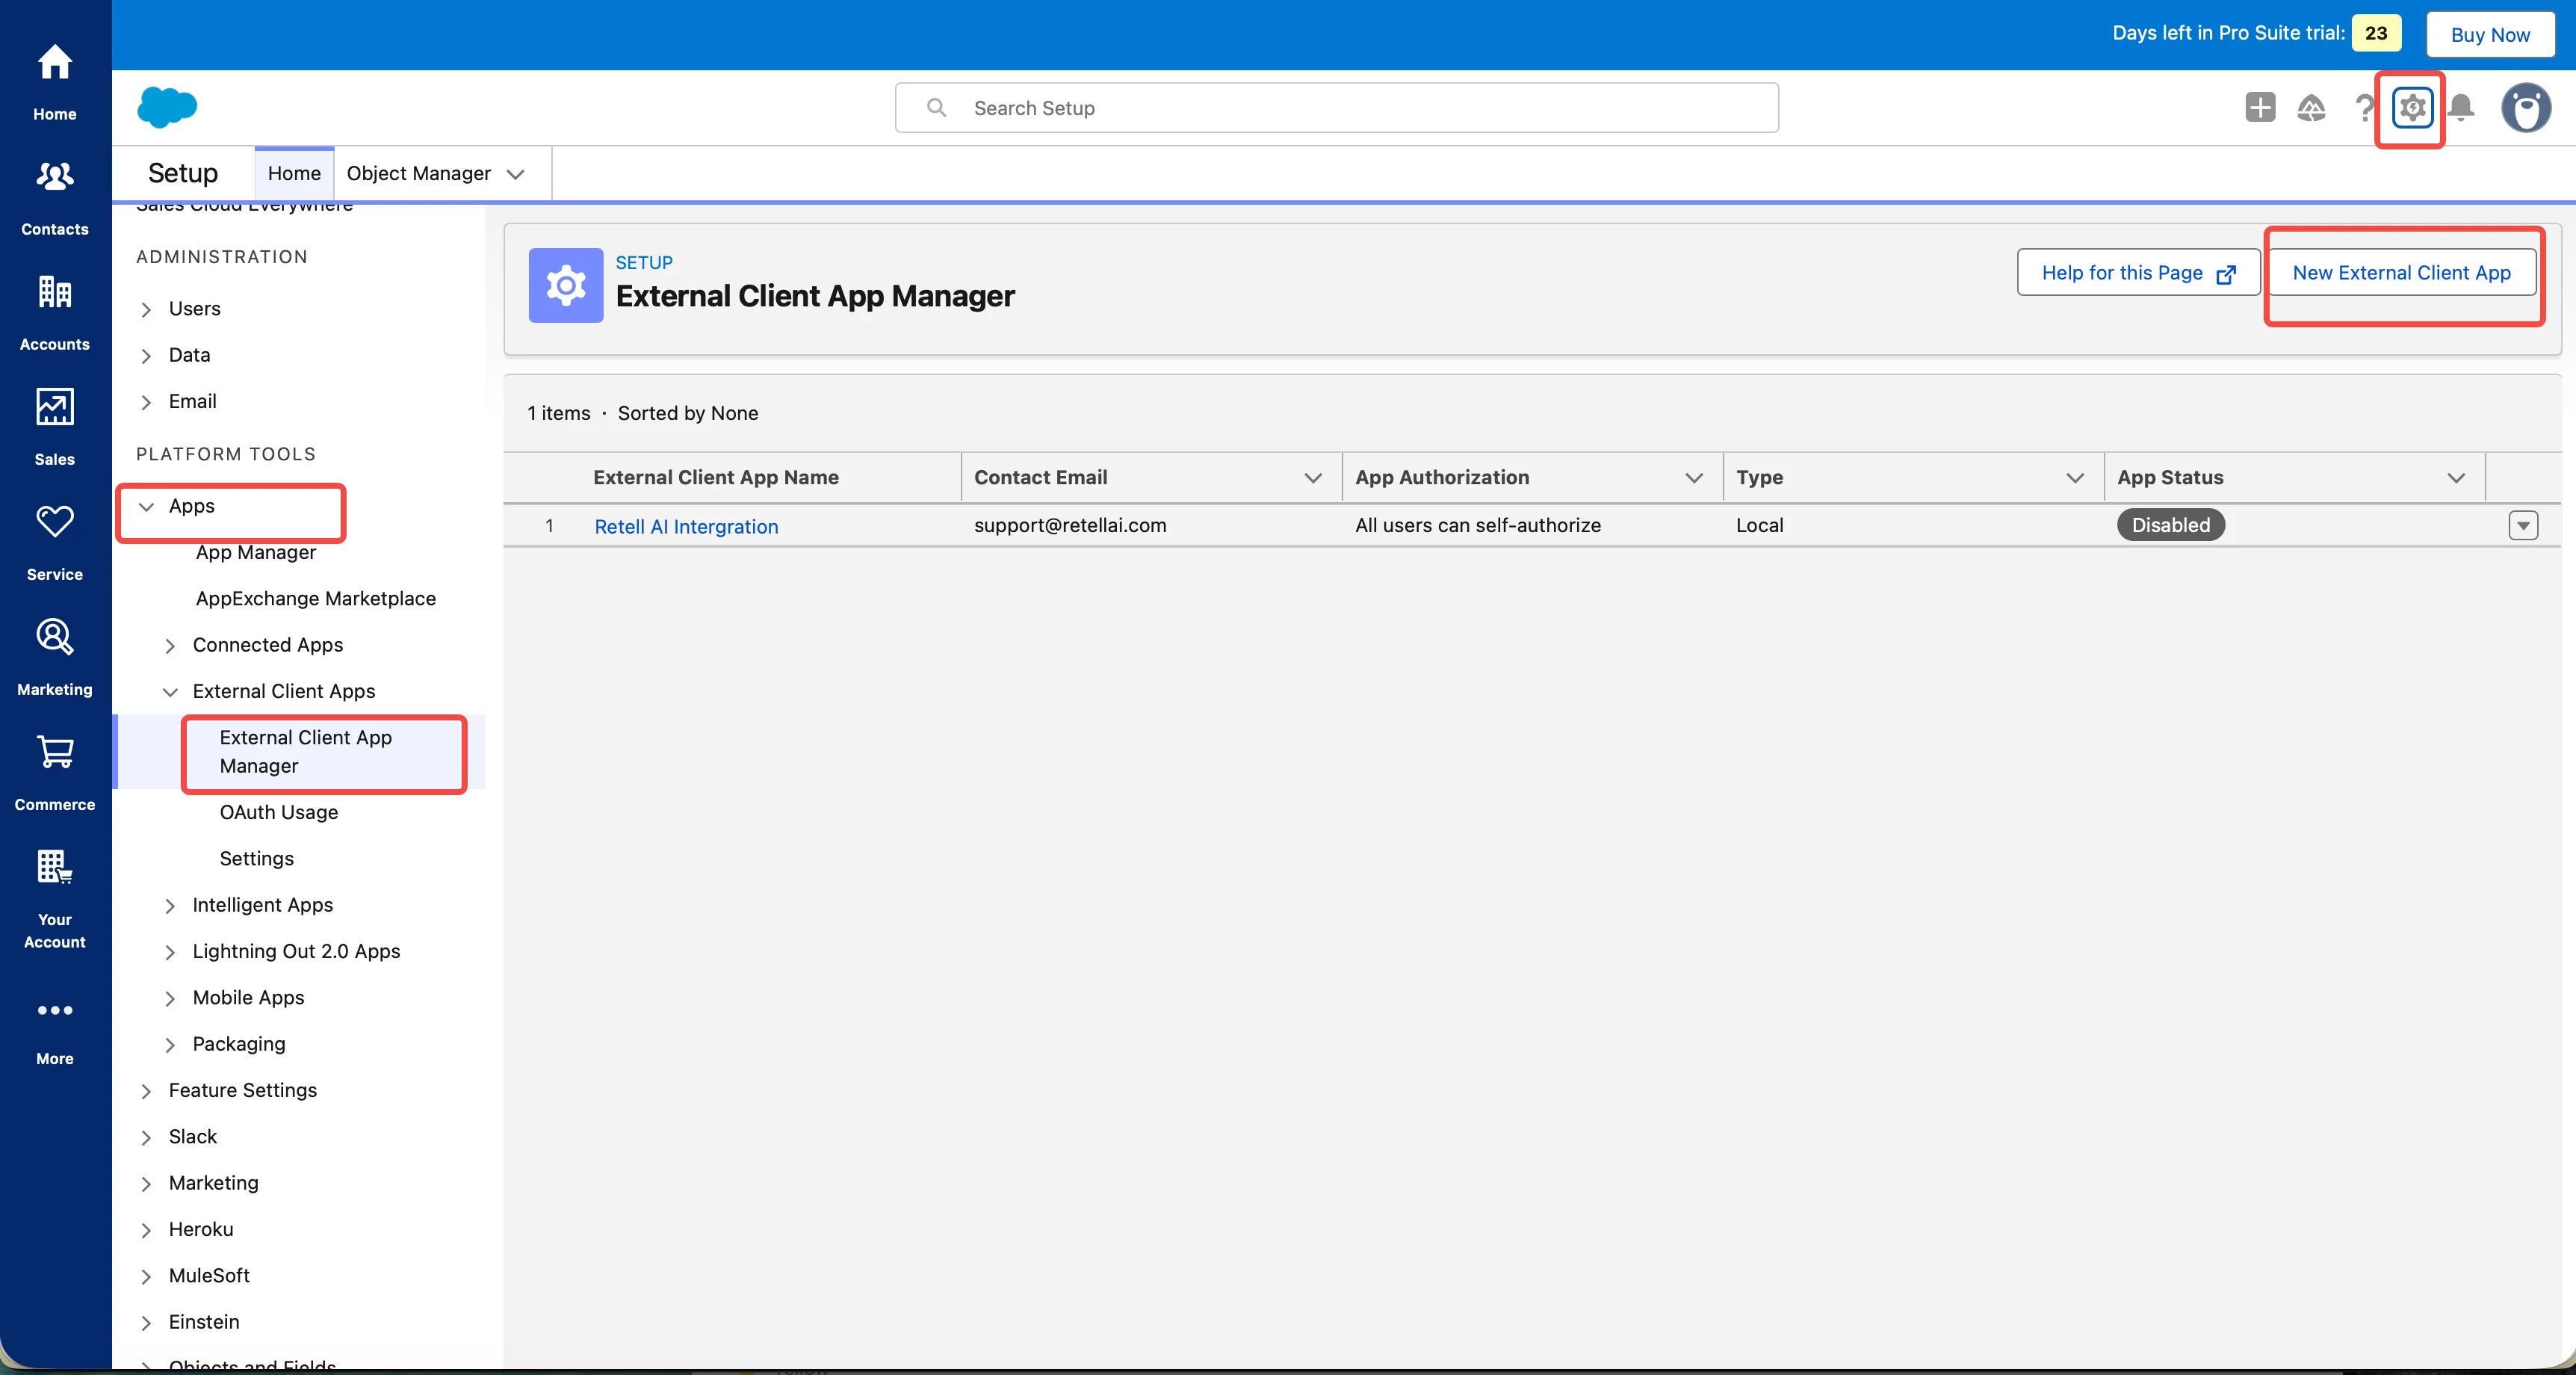
Log in to Salesforce as an administrator. Click the **gear icon** in the top-right corner, then select **Setup**.
In the Quick Find box, type **External Client App** and click on it.
Click **New Connected App** in the top-right corner.
Fill in the **Basic Information** section:
* **App Name**: Enter a descriptive name (e.g., `Retell AI Integration`)
* **API Name**: Auto-populated from the name
* **Contact Email**: Your admin email address
 ## Step 2: Enable OAuth Settings
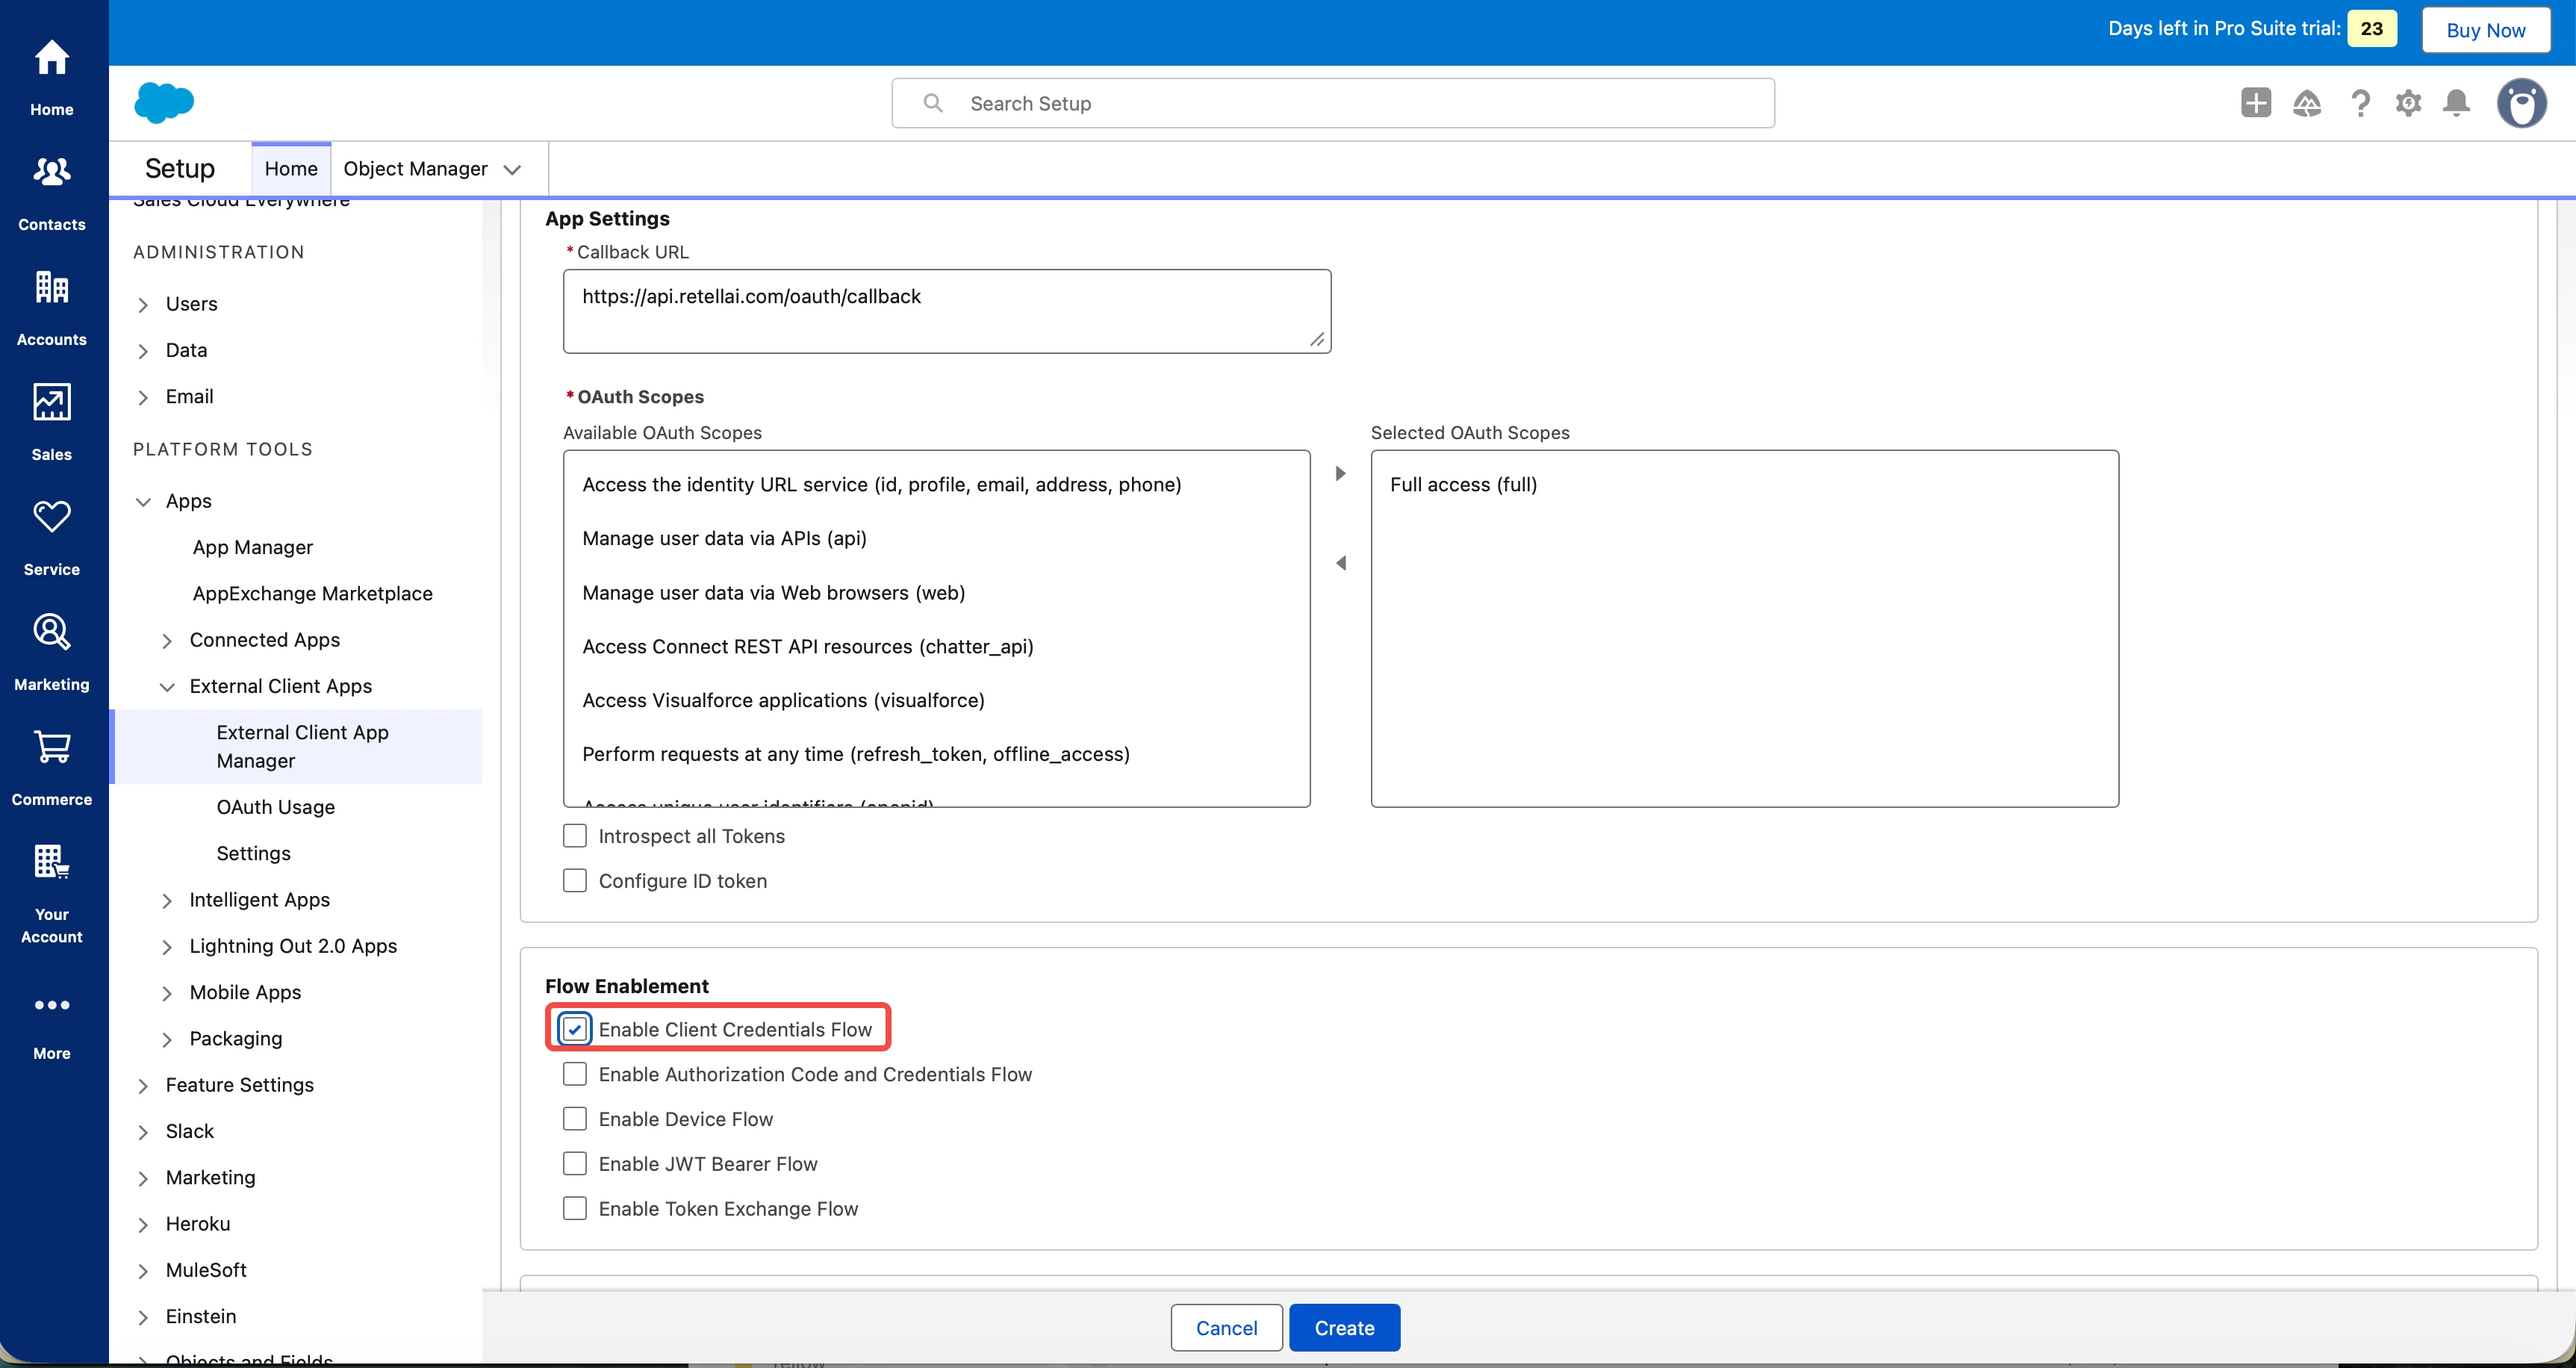
Scroll down to the **API (Enable OAuth Settings)** section and check **Enable OAuth Settings**.
Enter a placeholder **Callback URL** such as:
```
https://api.retellai.com/oauth/callback
```
The Client Credentials flow does not use a callback URL, but the field is required.
Check **Enable Client Credentials Flow**. This is the critical setting that allows Retell to authenticate without interactive login.
Under **Selected OAuth Scopes**, add the following scopes from the Available list:
* **Manage user data via APIs (api)** — required for REST API calls
* **Perform requests at any time (refresh\_token, offline\_access)**
Alternatively, select **Full access (full)** for complete API access.
## Step 2: Enable OAuth Settings
Scroll down to the **API (Enable OAuth Settings)** section and check **Enable OAuth Settings**.
Enter a placeholder **Callback URL** such as:
```
https://api.retellai.com/oauth/callback
```
The Client Credentials flow does not use a callback URL, but the field is required.
Check **Enable Client Credentials Flow**. This is the critical setting that allows Retell to authenticate without interactive login.
Under **Selected OAuth Scopes**, add the following scopes from the Available list:
* **Manage user data via APIs (api)** — required for REST API calls
* **Perform requests at any time (refresh\_token, offline\_access)**
Alternatively, select **Full access (full)** for complete API access.
 Click **Save**.
Salesforce may take up to 10 minutes to propagate changes after saving. Wait before attempting to use the credentials.
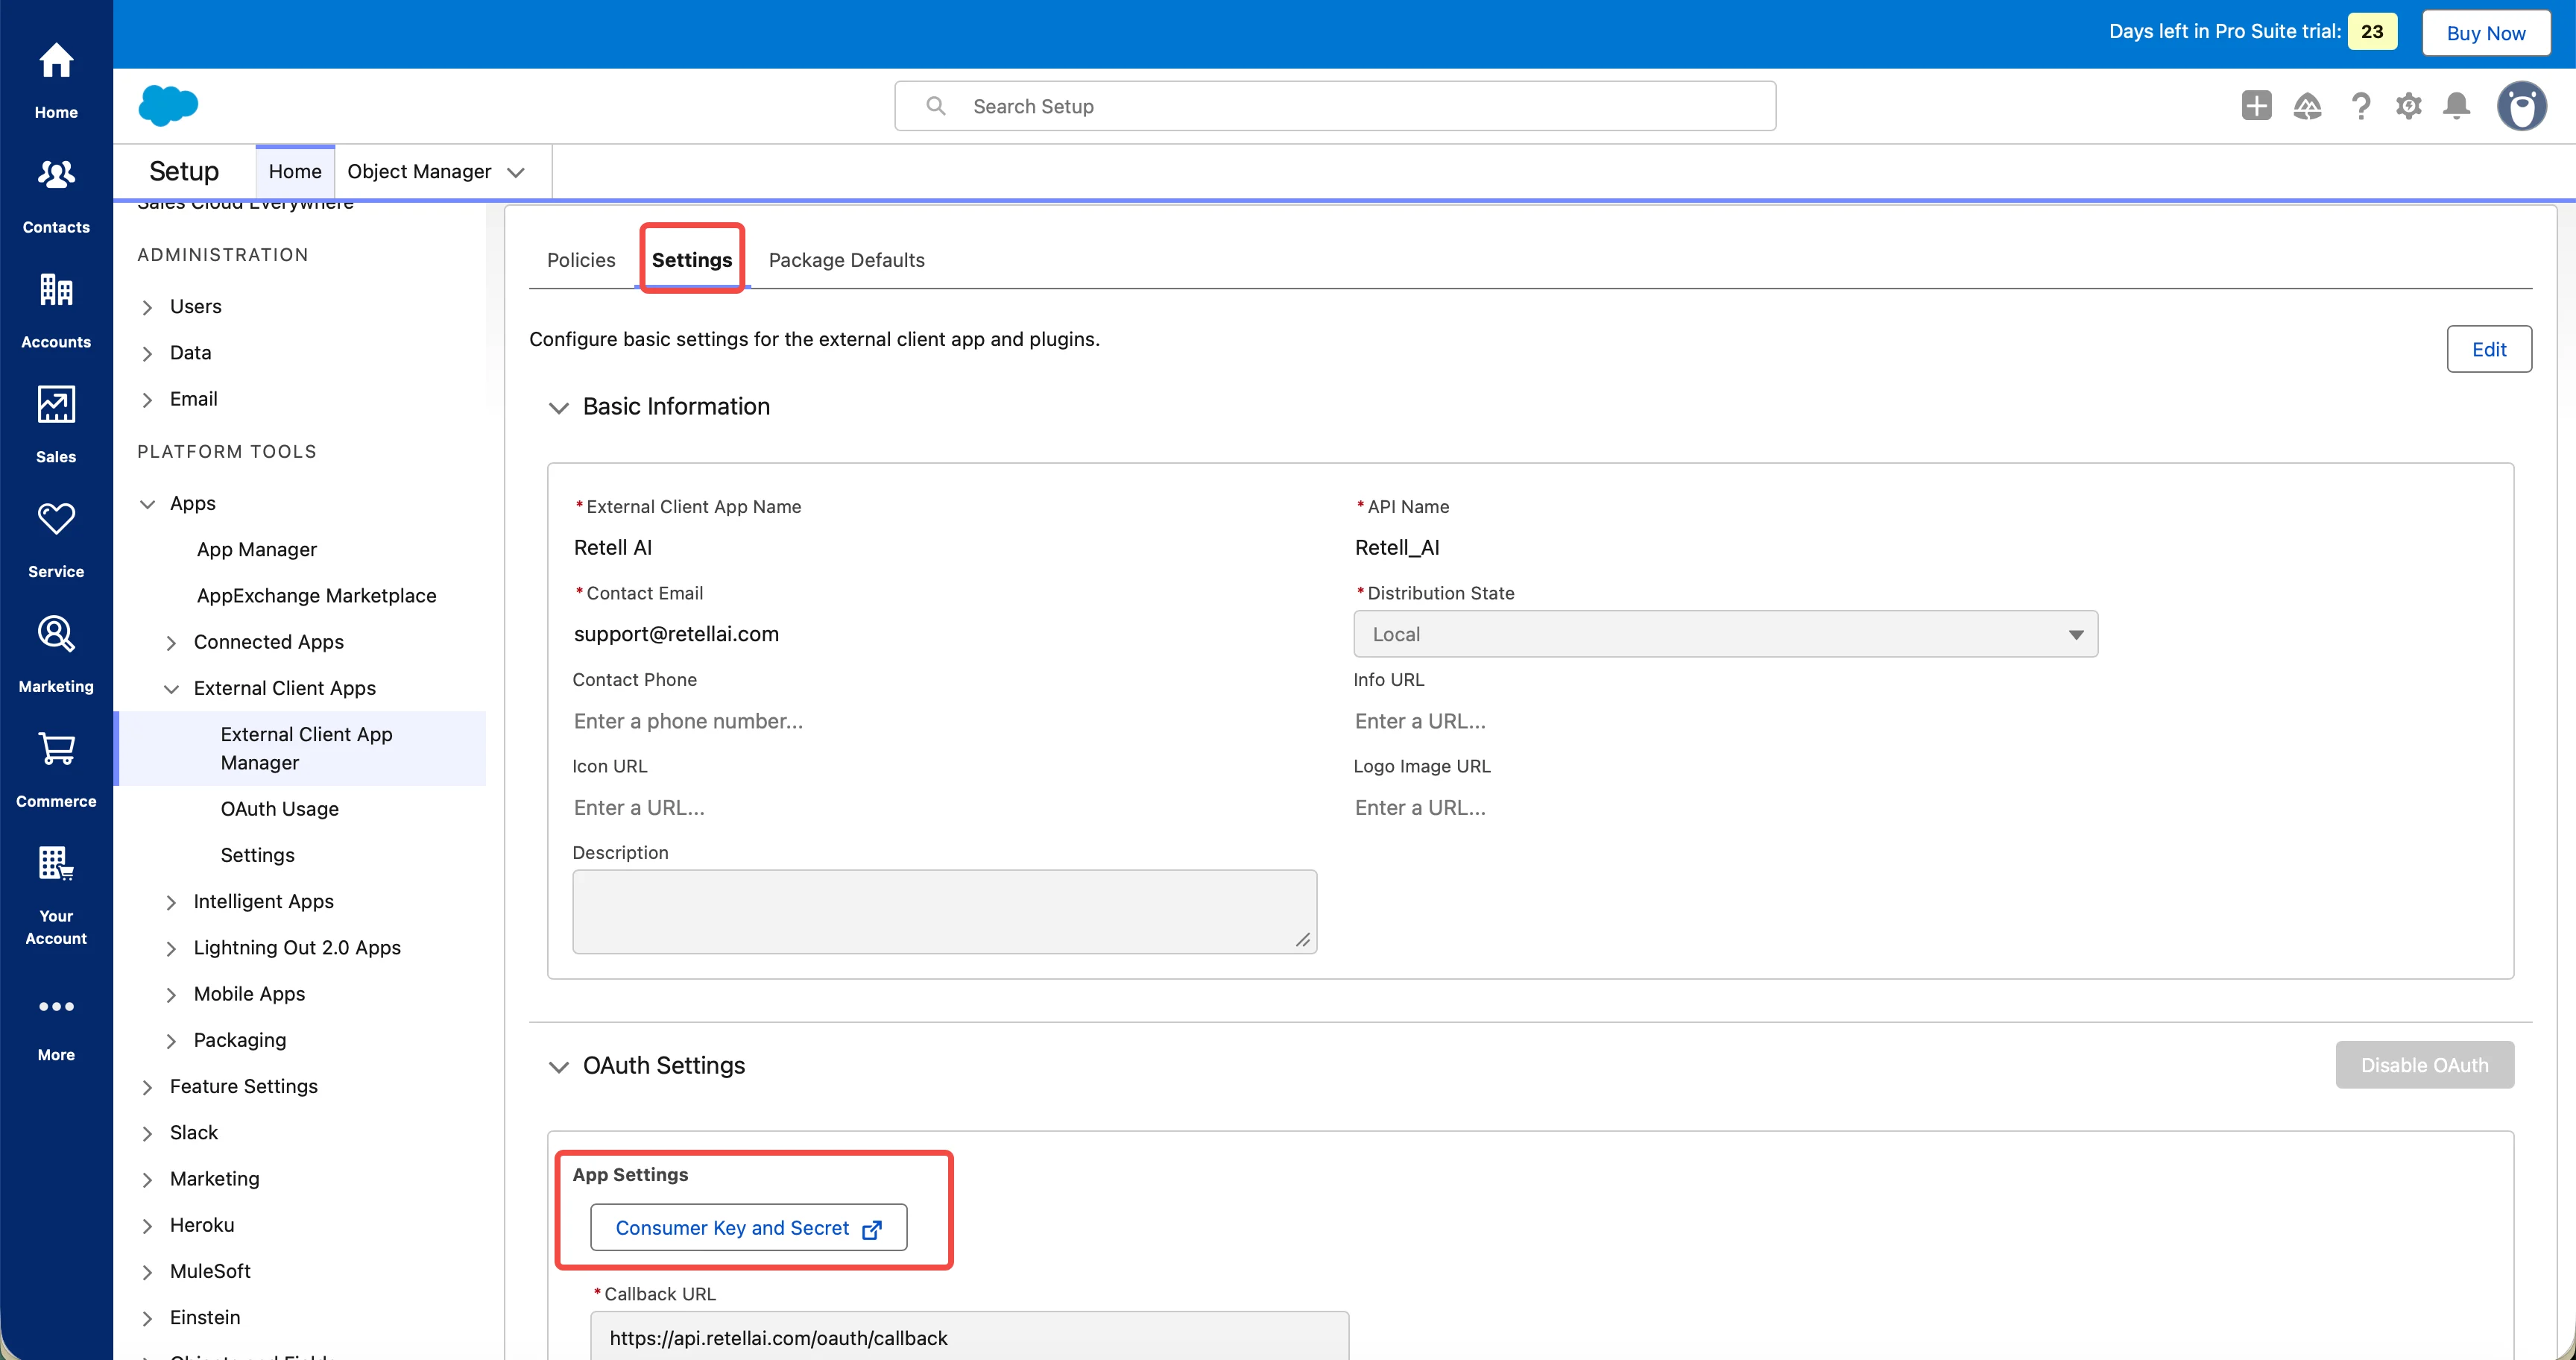
## Step 3: Get Consumer Key and Consumer Secret
After saving, you'll be taken to the Connected App detail page. Click **Consumer Key and Secret**.
You may be prompted to verify your identity via an email verification code.
Copy and securely store both values:
* **Consumer Key** — this is your Client ID
* **Consumer Secret** — this is your Client Secret
Click **Save**.
Salesforce may take up to 10 minutes to propagate changes after saving. Wait before attempting to use the credentials.
## Step 3: Get Consumer Key and Consumer Secret
After saving, you'll be taken to the Connected App detail page. Click **Consumer Key and Secret**.
You may be prompted to verify your identity via an email verification code.
Copy and securely store both values:
* **Consumer Key** — this is your Client ID
* **Consumer Secret** — this is your Client Secret
 Treat the Consumer Secret like a password. Never share it in plaintext or commit it to source control.
## Step 4: Configure App Policies
**OAuth Policies:**
* Enable Client Credentials Flow.
Under the **Client Credentials Flow** section, select a **Run As** user. This is the Salesforce user whose permissions the integration will use for all API calls.
Treat the Consumer Secret like a password. Never share it in plaintext or commit it to source control.
## Step 4: Configure App Policies
**OAuth Policies:**
* Enable Client Credentials Flow.
Under the **Client Credentials Flow** section, select a **Run As** user. This is the Salesforce user whose permissions the integration will use for all API calls.
 Click **Save**.
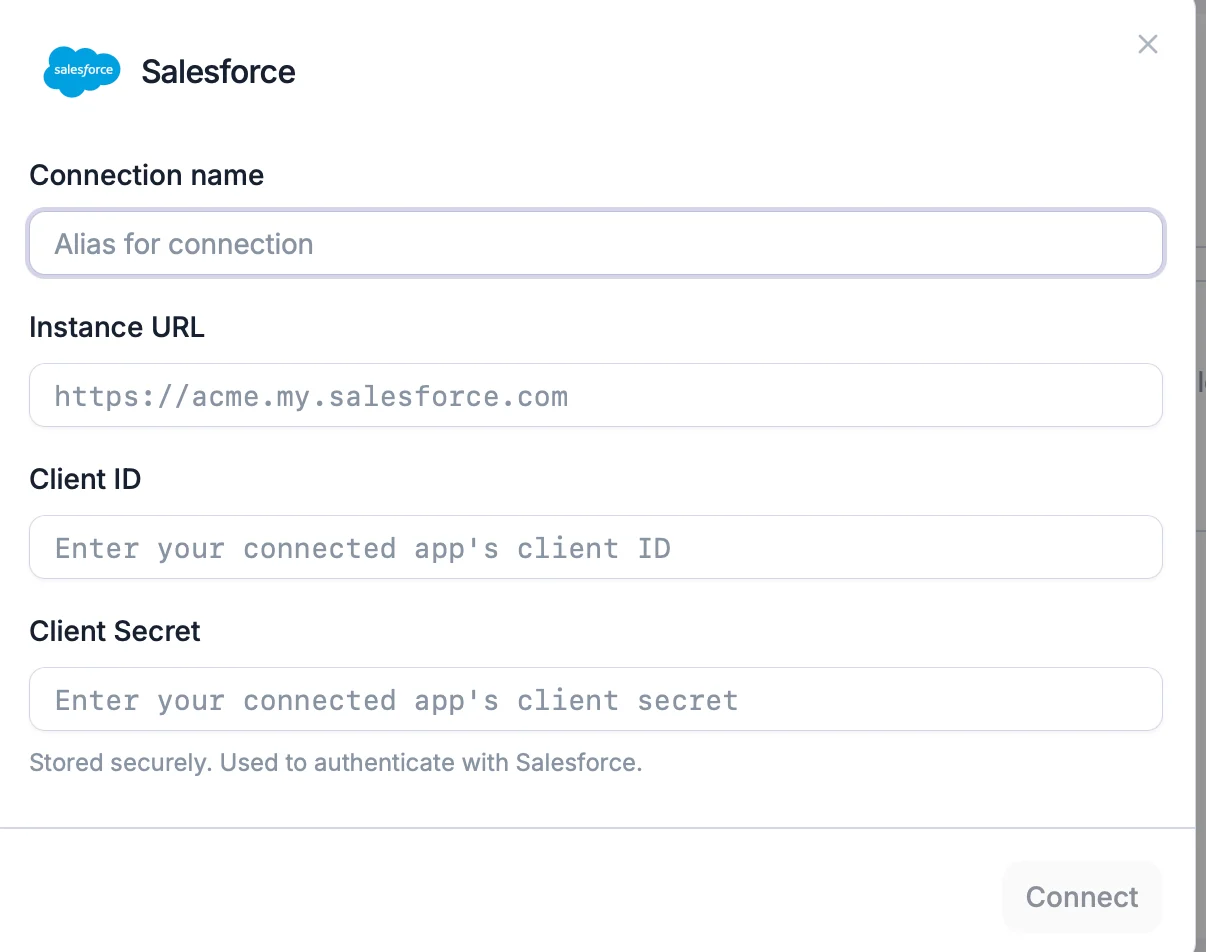
## Step 5: Connect Salesforce in Retell
In the Retell Dashboard, go to the **Integrations** section and select **Salesforce**.
Enter the Client ID (**Consumer Key**) and Client Secret (**Consumer Secret**) from Step 3.
Provide your **Salesforce domain URL** (e.g., `https://your-org.my.salesforce.com`).
Click **Save**.
## Step 5: Connect Salesforce in Retell
In the Retell Dashboard, go to the **Integrations** section and select **Salesforce**.
Enter the Client ID (**Consumer Key**) and Client Secret (**Consumer Secret**) from Step 3.
Provide your **Salesforce domain URL** (e.g., `https://your-org.my.salesforce.com`).