

Agent global settings
Open your agent’s Agent page and select Global settings in the right panel. If the panel is collapsed, select Open settings. Expand the section you need; several sections can stay open at once.
The Global settings tab groups the agent-wide settings by task.
Configure the agent
Expand Agent settings to configure the voice, language, model, and global prompt.- Voice & Language: Select a voice to open the voice library. Preview voices before choosing one; use Add voice clone for a clone or Custom Providers for your own provider account. Voice settings include speed, volume, and provider-specific controls. See voice configuration.
- Language: Choose the languages the agent understands and speaks. Use Multiselect for multiple languages; prefer a single language when possible for recognition accuracy. See agent language and multilingual agents.
- Model: Open the model dropdown and start with a model marked Suggested. Use the adjacent settings control for model options such as temperature. With a standard model, individual nodes can override the model. Speech to speech uses one model across the flow, hides per-node model overrides, and automatically selects a compatible voice when switching to or from it.
- Global Prompt: Write instructions that apply in every node. Use Agent Handbook for presets, including Speech Normalization.
- Transition Flexibility: Choose Rigid Mode or Flex Mode to control how the agent follows the flow.
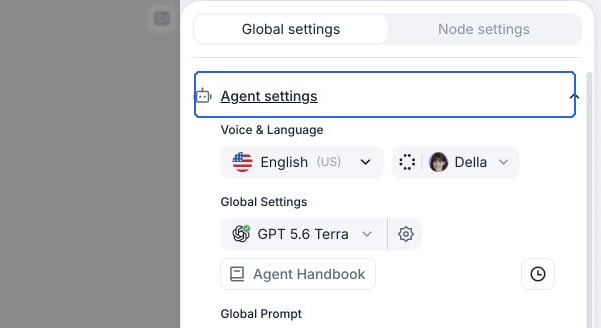
Voice, language, and model controls live in Agent settings.
Configure knowledge and memory
Expand Knowledge base & memory to attach documents, URLs, or text through a knowledge base. Advanced Settings contains retrieval controls and the knowledge base instruction. Use contact memory lets the agent recall a matched contact’s saved information. Saving information is configured separately under Post call memory settings. See contact memory for storage prerequisites and eligible conversations.Configure speech settings
Expand Speech settings to tune the voice agent’s turn-taking and audio:- Background Sound: Play an ambient sound during the call.
-
Response Wait time: how long the agent deliberately waits after the caller stops speaking before it responds, from no added wait (the default) up to 5.5 seconds, shown in milliseconds below one second and in seconds above it. This is a minimum wait: the agent holds off longer when it detects the caller hasn’t finished their thought. Raise it for callers who speak slowly or pause mid-sentence, but note the full wait is added to every turn, so a higher value makes the agent feel slower. In the API this is the
responsivenessfield, from 0 to 1 with a default of 1: a value of 1 adds no wait, 0.9 adds 1 second, and each further 0.1 lower adds 0.5 seconds, up to 5.5 seconds at 0 (values between 0.9 and 1 taper between 0 and 1 second). Check “Dynamically adjust based on user input” to let the agent tune its wait to the caller’s pace during the call. Individual nodes can override this setting in their speech overrides.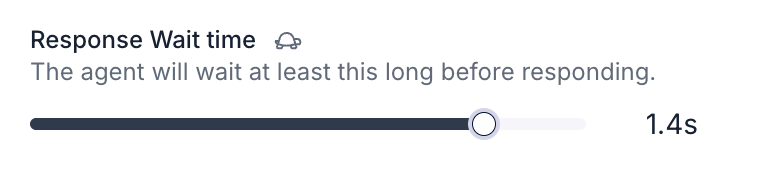
The Response Wait time slider in Speech settings.
- Interruption Sensitivity: Set how readily the caller can interrupt the agent. Lower values make the agent more resistant to interruptions and background speech.
- Enable Backchanneling: Configure the short acknowledgments the agent uses while listening. See backchanneling.
- Reminder Message Frequency: Configure reminders when the caller is inactive.
- Pronunciation: Set pronunciations supported by the selected voice provider and model.
Configure realtime transcription settings
Expand Realtime transcription settings to configure Denoising Mode, Transcription Mode, Vocabulary Specialization, and Boosted Keywords where supported. Boosted keywords bias recognition toward names or specialized terms. See background noise and transcription modes. These controls depend on the agent’s language and model. Standard transcription modes do not apply to speech-to-speech models. Transcription Mode sets the default for the flow. Choose Optimize for speed, Optimize for accuracy, or Custom Settings to select a speech recognition provider and endpointing. Conversation and subagent nodes can override transcription for one step. Nodes with an enabled override keep their own values when the global mode changes. Boosted Keywords sets the default keyword list for the flow. Conversation and subagent nodes can replace this list for one step, or use an empty override to disable boosting for that step.Configure call settings
Expand Call settings for voicemail and IVR detection, call screening, and keypad input. This section also contains End Call on Silence, Max Call Duration, and Ring Duration. Configure the opening pause under Begin settings, described below.Configure post call extraction
Expand Post call extraction to define structured results such as whether an appointment was booked. See Post Call Extraction. This is separate from saving contact memory.Configure security and webhooks
Expand Security & fallback settings for data storage, retention, guardrails, secure URLs, fallback voices, and default dynamic variables. Expand Webhook settings to configure the agent’s event endpoint. See register a webhook.Chat agents show Chat settings and Post chat extraction. Voice-only speech, transcription, and call settings do not appear. See chat agent settings.
Configure who speaks first
Select the Begin node, then open Begin settings under the Node settings tab. Choose who speaks first and, when the agent speaks first, set Pause Before Speaking to delay the opening utterance.
Begin settings controls who starts the conversation.