

Conversation flow subflows
Make complex agents easier to build, reuse, and maintain by packaging parts of your conversation into subflows. A subflow is a mini flow (a group of nodes) that you can reuse across agents and flows.Subflows were previously called Components. The feature is the same; only the name changed.
Why use subflows?
- Reuse: Build once, drop into many agents and flows.
- Consistency: Keep behavior uniform across use cases (e.g., identity check).
- Clean canvas: Hide detailed logic inside a focused subflow.
- Faster iteration: Update a shared subflow to improve every agent that uses it.
Where to find it
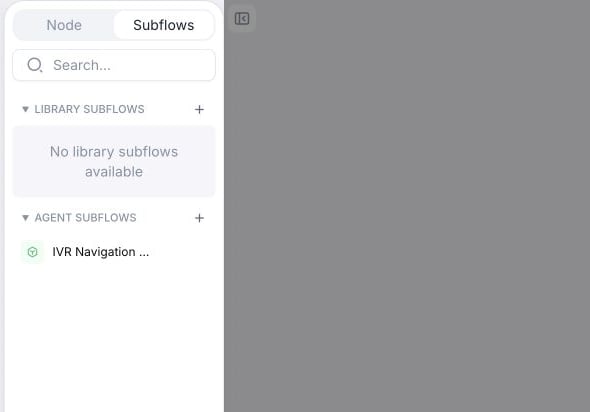
Open Subflows in the left sidebar to find library and agent subflows.
- Left sidebar → Subflows tab
- Two sections:
- Library Subflows: Account-level, shared across agents.
- Agent Subflows: Local to the current agent.
Switching between flows: Use the flow selector at the top of the builder (it shows Main flow by default) to move between your main agent, any open subflows, and transfer agents. Each one opens in its own editor tab, and you can return to Main flow at any time.
Create a subflow
You can create either a library (shared) subflow or an agent-level (local) one. Both open in a dedicated editor tab.- In the Subflows tab, click the + button next to Library Subflows or Agent Subflows.
- You’ll start with a “Begin” node, a basic conversation node, and an “Exit Subflow” end node.
- Add nodes and connect edges to form your subflow.
- Set a start node by connecting the Begin tag to the first node.
- Link the “Exit Subflow” node correctly so you won’t get stuck inside the subflow.
- Switch back to the main agent using the flow selector (labeled Main flow) at the top of the builder.
- Rename the subflow by clicking the ”…” to the right of its name.
- Subflows cannot contain other subflows; you add regular nodes inside a subflow.
- Available node types match your agent’s channel (voice vs chat).
Add a subflow to your flow
- From the Subflows tab, click a subflow. A single subflow node appears on your canvas.
- Connect into the subflow: link any node to the subflow node.
- Connect out of the subflow: select the subflow node and connect its outgoing edge to where the conversation should continue.
- To edit what happens inside, open the subflow’s editor tab and modify its internal nodes. In that editor, Subflow settings controls access and transition flexibility, Node settings configures the selected node, and Test Subflow opens testing.
- You can rename the subflow node, which is also reflected in the subflow.

Shared vs local subflows
Every subflow is either shared across your account or local to a single agent. That choice decides who your next edit reaches.Convert between shared and local
Select the subflow node, open its Subflow settings panel, then set Subflow Access to Agent Only Subflow or Shared Library Subflow.
Choose subflow access in Subflow settings.
What to watch for
- Deleting a library subflow turns every linked instance into a local copy and stops sync updates, so agents that used it keep working.
- Published agents can reference shared subflows. The behavior of a published agent can still change if it uses a subflow that gets updated. To prevent this, convert to a local subflow before publishing.
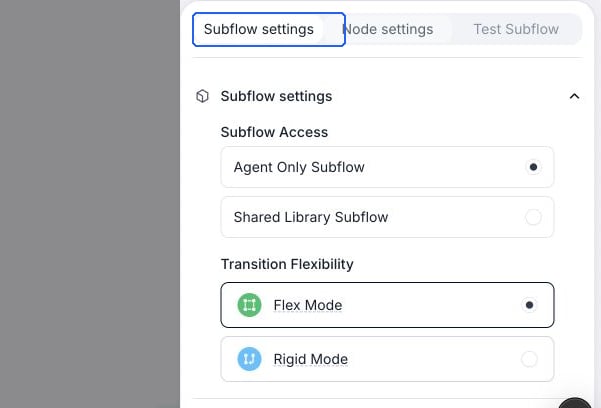
The subflow editor has separate Subflow settings, Node settings, and Test Subflow tabs.
Testing
- To test a subflow under the Test Subflow panel, add the subflow to the main conversation flow first so it initializes properly.
- The global prompt of the main conversation flow applies to all subflow nodes implicitly.
- To test a subflow alone, make it a shared subflow and create a new empty agent with only one subflow node.
Best practices
- Keep subflows focused: One clear job (e.g., “Collect Shipping Address”).
- Name clearly: Use action + outcome (e.g., “Verify Identity”).
- Design clean entry/exit: Always set a start node; include an end node to exit cleanly.
- Reuse variables: Use dynamic variables to pass captured data back to the main flow.
- Test in context: Open the Test panel to simulate end-to-end behavior after inserting the subflow.
FAQ
-
How do I update a shared subflow used by many agents?
- Under any agent, navigate to the subflow’s edit page. When you edit it, changes apply everywhere it’s used.
-
Can I stop changes from affecting an agent?
- Yes. In that agent, turn off Sync Updates to convert its reference to a local copy.
-
What happens if I delete a library subflow?
- Agents keep a local copy; they stop syncing with the deleted library item.
-
Can I move a local subflow into the library?
- Yes. In Subflow Access, switch it to Shared Library Subflow to create a shared version and update references.
-
Can subflows include tools/functions?
- Yes. Subflows can include function nodes and use your configured tools. Tools behave the same as in the main flow.
- The tools need to be defined within the subflow and won’t be visible outside at the agent level.
-
What if I did not link the Begin node in a subflow?
- It transitions to the next node based on the subflow node edges.
-
What if I did not link the Exit Subflow node properly?
- It stays stuck inside the subflow and cannot transition out.